Katrina Tarrant Articles

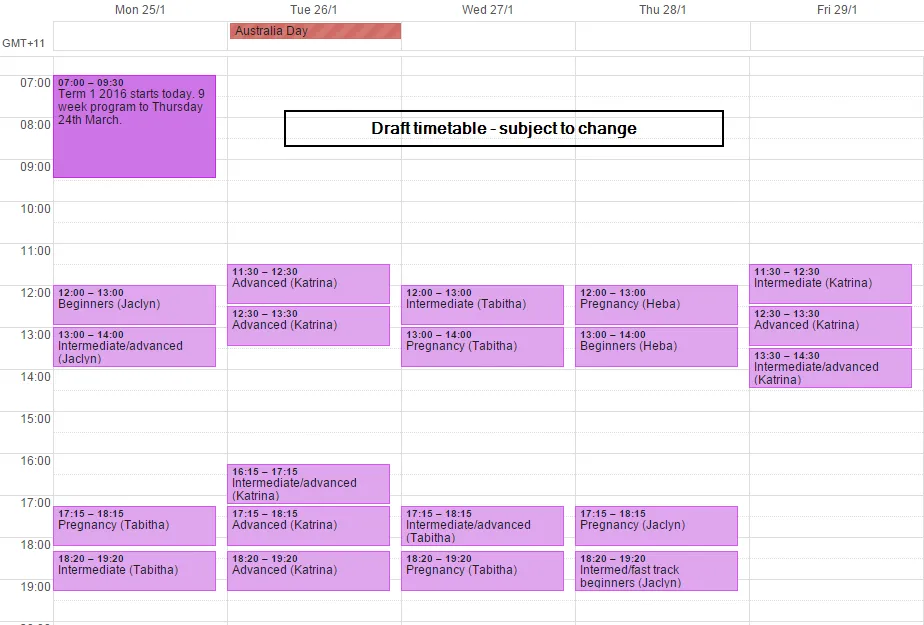
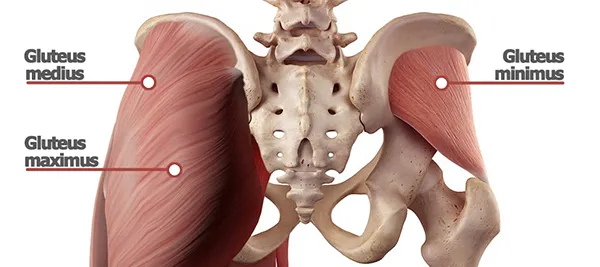
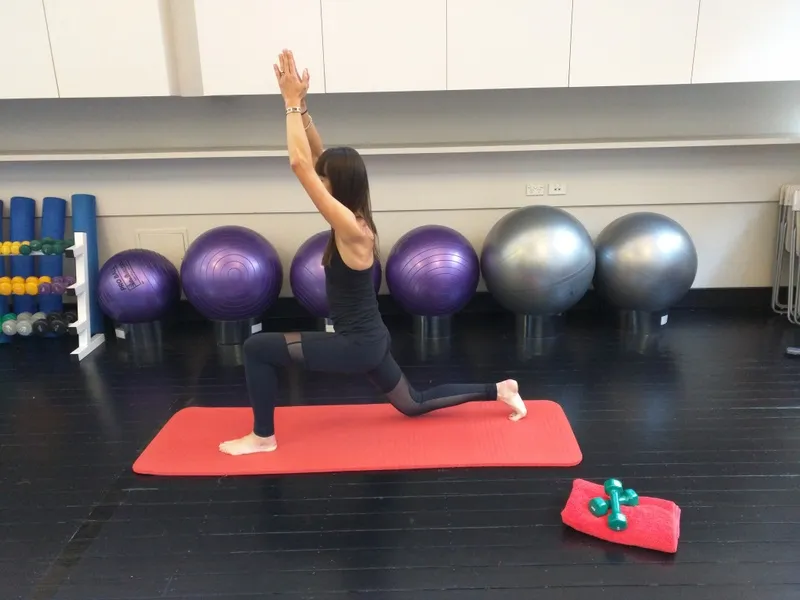
Abdominal Separation after baby

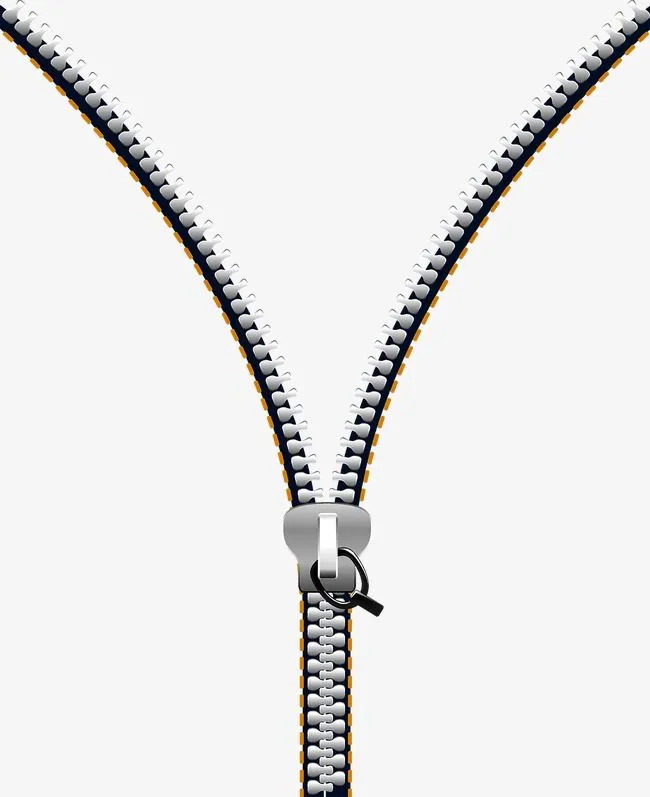
The zipper front – the best visual cue for the lower belly I have heard!


Abdominal separation or Rectus Diastasis (RD) is a common and necessary part of carrying a baby and being a new mum. It affects 66% of women.

RD is the wonderful pregnant body’s way of getting your abdominal muscles around your growing belly by separating down the middle. This is not a complete separating away, but more a stretching of the thin tissue of connective tissue or fascia called the linea alba that gives our abdominal muscle that vertical line in the ‘six pack’. Picture those men’s fitness magazine cover boys – the dividing up of the abs into those ‘packs’. RD is necessary but if the separation of your belly muscle is too great (they say, greater than 3 fingers wide), there can be knock on effects to the region. These can include:

  • Poor abdominal activation and imbalance about the deep corset abdominals (‘the core’)
  • Inability to breathe well with the diaphragm, our best breathing muscle and also a big part of our postural ‘core’ control
  • Poor pelvic floor function such as incontinence, urgency, and also the pelvic floor’s important role in our posture
  • Lower back, pelvic or hip pain and/or poor movement
  • Poor aesthetics – a jelly belly and lower abdominal protruding outward, forcing us to suck in our bellies ( to look better) and create another bag of problems about the region.

Back in January 2014, I wrote about 6 top tips in protecting abdominal separation. Recently I stumbled across the teachings and blog from a women’s health physio from the US named Julie Wiebe. I love this woman! She is a passionate physio doing amazing stuff assisting women about the world in ante natal, post natal and pelvic floor troubles.

Among many things (of which I am sure you will hear from me in fixnews letters to come), she had the most wonderfully simple analogy for the separated belly- the open fly or zipper.

She says:

I like to think of a diastasis (ie belly separation) that has resisted closure like an open zipper. An open fly affects more that just the zipper, it strains the button above, it messes with the fit of the pants, exposes things not supposed to be exposed.

What you do with the abdomen in a short prescribed exercise session a few times a day cannot beat 16-18 hours a day of standing, sitting and moving in lousy alignment that separates the midline all day. If your alignment keeps your fly open all day, then all your movements and daily exertions, like lifting little ones, will reinforce keeping it open. Same goes for fitness. The alignment you do fitness in is critical to approximating the abdomen and connective tissue to encourage closure.

What a perfect picture. If you stand, sit or exercise all day with bottom tucked under, hips pushed forward and slumped like the illustration below, your fly zipper will always gape open.

This will never allow for the connective tissue of the linea alba in your belly to come together, always being pulled apart like the open zip. Instead, stand tall with your waists gently lengthened and your ribs stacked beautifully over your neutral level pelvis. You could now picture that your fly will be drawn together, even if you did forget to do it up after that dash to the loo while managing your crying little one in the pram. Aim for this posture as much as you can, and your belly separation will be encouraged to come together. Even more, your diaphragm, your belly muscles, your pelvic floor and your spine will start to work more as it should, becoming stronger and more supportive.

Ab separation will never start to correct in that first year after baby if we are always in a poor posture for most of our days ( The ultimate goal that you want to achieve is a balanced well working system of deep belly, outer belly, pelvic floor, diaphragm and butt muscles). And as Julie has said, with all great intentions at working on this in your gym or Pilates classes, nothing works better than thinking of your posture and the closed zipper for best outcome. Easy. 

So when standing, sitting, feeding, carry baby, pushing prams, at the gym ( after 4 months post baby girls!), cleaning the house, driving the car… remember your belly as the zipper!

Love it!

Why not check out Julie’s website and blog at

http://www.juliewiebept.com/

Read More

The 2015 women’s health and fitness summit

Heba wows her audience on speaking about the troubles with a tight pelvic floor

health and fitness summit

This summit held September in Melbourne is an annual gathering for all those interested in women’s health, fitness, and nutrition, in whatever capacity. It brings together world-renowned speakers and presenters from all areas of these industries, to inform and inspire.

Heba submitted a proposal with many to speak at The Platform, a program that the summit encourages to discover and nurture new presenters in the arena of women’s health. And amongst the incredible response, Heba was invited to speak about overactive (tight) pelvic floor muscles. She was one of only 4 winners to present. Knowing that this is her true passion, it did not surprise us that she was asked to speak.

You can watch this very presentation on youtube. It runs for 20 minutes or so and worth every minute. Heba speaks using such wonderful and simple examples. Things really make sense and to be honest, I bet all of us watching start to think that she could be speaking about bladder and pelvic floor habits of our own or our friends/mothers/wives.

Pelvic floor over- activity, tightness and spasm can be a very common problem with both men and women’s pelvic floor muscles. Perhaps some of these common signs of the tight pelvic floor could be you or someone you know?

  • Urinary urgency. Each and every time the minute the keys are in your front door, do you need to urgently wee? Do you sometimes not even reach the loo in time and have an accident?
  • High frequency need to urinate. Do you need to get up several times per night to wee? This is common but not considered normal.
  • Bowel troubles such as anal fissures, constipation and pain on voiding. Do you have issues that could tell you that your pelvic floor is too tight when on the loo for ‘number two’?
  • Painful sex. Is penetrative sex painful, either at the surface or deep within? Is there a deep pelvic ache after you have sex?
  • Do you suffer from pain about the hip, pelvis and spine? Perhaps you have pain around the tailbone or pubic bones, hip or referred down the front of your upper thigh?

If so, did you know that women’s health physiotherapists are at the forefront of being able to manage and treat these problems? Teaching how to ‘let go’ or ‘turn down’ the pelvic floor muscle tension is the goal here to allow for a more normal tension in this region and allowing for better sexual, bladder and bowel function. A variety of treatment techniques can be called upon, including any of:

  • Internal massage (vaginal) and trigger point release work of the pelvic floor muscles
  • Relaxation techniques and stretches about the hips, pelvis and nerve pathways in the region
  • Outer massage, bony realignment and muscle retraining and strengthening of the pelvis, back, hips and upper legs. Restoring a better muscular balance of muscles working together around the pelvis needs to be assessed and addressed for a good long term change to the issues associated with the tight pelvic floor. After all, what was it in the first place that made these pelvic floor muscles tighten and become problematic?
  • Exercise advise. Did you know for these women and men, training hard at the gym, doing too much Pilates and pelvic floor Kegel type exercises will actually make their pain and pelvic floor symptoms worse? Strengthening an already tight and spasmed pelvic floor will make the tension only increase and pain and symptoms worsen. This can be said for any muscle in your body.

Most women (and men) would put up with these types of problems. I guess it is because mostly we assume nothing can be done for this sort of pain. GPs are sometimes at a loss when all other urine tests, blood tests, swabs and scans have been done and appear normal.

Watch Heba’s speech and we hope that this can inspire you to speak openly with your friends and doctors about the problems seen with the tight pelvic floor.

Go Heba!

Read More

The do’s and dont's of using weights

Resistance and weight training

Strength or resistance training has many reported benefits, but just picking up any old set of dumbbells or barbells could do you harm. Inappropriate weight, poor postures while exercising and dodgy techniques can all mean possible injury. Throwing your body around, grunting and thrashing about in front of the gym mirrors is not the way it’s done!

Weight training uses resistance to build the strength and endurance of muscle. Doing weights repeatedly and consistently, your muscles become stronger. Some of this is due initially to a phenomenon called ‘neural adaptation’. This is felt as an initial noticeable gain in strength, and is attributed to the nerves firing more messages to the strengthening muscles, making it contract harder and stronger. After this initial adaptation, there is a plateau we feel in our strength gains. Keeping the muscles guessing with a broad range of exercises and movements will get you that extra strength. This is when the muscle fibres actually start to thicken or ‘bulk up’.

To put this into perspective, a muscle fibre within any of your muscles are as thin as a human hair. The cells of these fibres are what thicken in response to resistance training. It is also thought that we are born with a finite number of muscle fibres, so weight training cannot stimulate your muscles to grow more. It is only this thickening (or hypertrophy) of the muscle fibre cells that make us look bulkier in our muscles.

The basic principles of weight training

There is so much out there in the literature to read about training programs. However, here are a few of the basics for the novice when it comes to weight training. All principles below must be considered for a safe and effective program.

  • The weight. How heavy a weight should I use? Should I use free weights, fixed weights, my body weight, resistance bands, or kettle bells?
  • The exercise or movement. Do I move my body in a small movement? Large movement? In what position should I exercise? How do I incorporate the effects of gravity?
  • The repetitions. Do I attempt sets of 3-5 repetitions, or 10-15? How fast or slow do I move?
  • The sets. So do I just attempt one set, or 3? Do I do them all at once, or in between other exercises?
  • The rest and recovery. How soon can I go back to the gym and attempt these same exercises again? Can I exercise when I still feel sore and tired form my last workout?
  • The variety. How do I fend off boredom at the gym with my weights sessions? Or get that muscle bulking up and keep it guessing?
  • The progressive overload principal. So how do I safely progress my weights without injuring myself? These weights seem easy, so by how much can I step up the resistance?

How heavy should I make my weights?

In resistance training, the term Repetitive Maximum (RM) is used to work out the right weight for an individual. RM is the maximum number of repetitions that can be completed with a given resistance or weight before the muscle fatigues. To gain strength, the muscle needs to reach fatigue for the changes to take place in the nerves and the muscle fibres.

It is the RM range that determines what type of improvements the muscles will make. The optimal range for improving muscle strength is 8–12 RM for a beginner and 2–6 RM for the more advanced. So using the beginners RM of 8 as an example for a biceps curl, this is the weight that this individual can curl the given weight 8 times, but feels that the last few reps are really getting difficult. Not impossible, but with a little strain, effort, quiver or ‘burn’. Strive for 3 sets with a rest in between. Stretch or move to another muscle group for your ‘rest’.

It is often a good idea to seek help with this weight prescription. If you can imagine the numbers of muscle groups to set the right weight for, there is quite a bit involved to get it right. Too heavy and you risk injury. Too light and you will not get the training benefits.

As you become stronger, you will notice that the 8RM weight starts to feel too easy. It is time to work out how to progress. You can either increase the reps to 12-15 with that same weight, or add an extra set. Or find your new 8RM, which will be a slightly heavier weight to feel that fatigue in your last repetitions once again.

How should I move with the weighted exercise?

Here are a few tips with respect to movement.

  • Move through the greatest range or arc of movement you can. The muscle will improve its contraction strength at all angles this way.
  • Move slowly in each direction. Try counting to 3 as you flex and also as you extend. Your muscle will gain strength as it shortens (concentric contraction) and lengthens (eccentric or braking contraction). You need strength in both types of contraction in everyday life. For example, walking down steps, your thigh muscles eccentrically slow you down and this is hard work! As you walk up steps they concentrically contact to pull you up the stairs. Again, hard but different work.
  • Think of your movement as a team effort. There are many muscles working to stabilise the region, hold your posture. There are even more than just the one muscle working to flex and extend the arm or leg.
  • Be very aware of your trunk and pelvic postures. Remember safety first! Protect your neck and lower back as you exercise. ‘Melt your shoulders from your ears’ and into your ‘shoulder blade pockets’, be aware of your ‘pelvic bowl of water’, and ‘lengthen gently through the back of your neck’ to the base of your skull. Again, advice from your exercise physiotherapist can give postural awareness cues right for you and your posture as you weight train.
  • Breathe. Don’t forget to continue with breathing and avoid holding your breath under the effort, or when distracted. Your diaphragm not only breathes the best for you, but is also an important part of your trunk stability and support (or ‘core muscle’). Breathing ‘deep and wide’ as you move with your weights will therefore deliver the oxygen you need, help support your posture, makes sure the pressures on your abdomen and pelvic floor muscles is more controlled, and prevents you looking like a beetroot!

My wrists and elbows hurt

The way in which you hold the dumbbells or barbells can increase your risk of injury around your lower arm and hands. Tendonitis of the forearm or wrist muscles can occur with too much loading or stress through the region. Big heavy upper body weights are probably OK for your shoulders and upper back, but these weights would be too much for your lower arms to bear. Keep safe here and not put yourself out of weight training due to a pesky tendonitis injury. They are often hard to settle and will only bring about frustration.

  • Grip your weights lightly. Hold your weights enough to feel secure, but don’t squeeze the life out of them. This only overloads the forearm muscles.
  • Once you have your light grip around the weight, imagine you have a brace or splint immobilising your wrists. Lock them into place and prevent the hands and wrists from deviating side to side throughout your larger movements. As a guide, the position of your wrist and hands when typing or playing the piano is the safest posture in this area. Can you keep your hands in this position while holding the weight?
  • In some instances, it is actually wise to wear a small wrist brace or splint. You have probably seen some at the gym wearing supports for the wrist and hands. This would be particularly helpful with higher weights in advanced weight users.

How can I keep my muscles guessing?

So you’ve got the bug and can start to see and feel you are stronger. Perhaps you are passed that now and for your efforts, you can’t feel as much gain. Don’t feel disheartened; just mix it up a bit. Still staying safe with all of the tips above, why not consider:

  • Moving from fixed “Nautilus’ weights to free weights? You will work harder here on your team of muscles involved.
  • Moving from weights to body weighted exercise?
  • Change your apparatus – move from weights to bands or to ropes?
  • Change the postures in which you do your exercises? Try sitting, lying or even kneeling on a swissball. Move from sitting to standing, or sitting to lying
  • Varying your exercise? Add a cross training activity such as swimming with hand paddles for upper body conditioning, yoga for that amazing strengthening effects from flowing from one posture to the next as seen with Ashtanga styles or ‘power yoga’.

This variation will keep your body and muscles guessing, move you in different ways and prevent that boredom of repetitive unidirectional movements.

There is so much to weight training, but this will give you a great start. Feel free to ask your Fix Program physios about the right sort of weights use for you. And if you’re at all worried about your postures when at the gym, wrists hurting or how to employ good technique, ask us!

Perhaps you could spread the word when you see those fast moving, breath holding, poor postured, red faced gym goers at your local gym!

Read More

Pregnancy and swelling

Do you feel like your legs are as thick as tree trunks?

By Nicky Davies, Massage therapist form TREWellness Centre, Cremorne

You may be pregnant, trying to get pregnant or had your baby. It doesn’t matter which boat you’re in, no doubt you’ve heard lots of stories about “what to expect when you’re pregnant”. Every pregnancy differs from person to person and baby to baby, however some symptoms are quiet common.

One of these is puffy legs, ankles and hands (which can lead to carpel tunnel syndrome.) This is one of the conditions that we aim to relive or elevate with pregnancy massage.

Hormones, namely progesterone and oestrogen, have a huge role to play during pregnancy which is to primarily prepare your body for the main event. Unfortunately these hormones also cause some unwanted effects, such as pregnancy related swelling. Swelling (or oedema) is an increase of fluid in the body. This can often be up to 40% in the third trimester of your body’s usual fluid levels. No wonder it gets stores in the legs and we are left feeling puffy and without shapely wrists or ankles! Progesterone causes the smooth muscle to relax which impacts on the body’s ability move or pump the oedema away. This oedema often pools in the ankles, calves hands and wrists.

Even Kim Kardashian can’t escape pregnancy related ankle swelling!

Pregnancy massage to these areas consists of long gentle pumping strokes to help flush out the congested areas, a bit like a lymphatic massage. This helps to reduce the discomfort on the surrounding soft tissues and improve mobility of the ankle joint. This has, with some clients, provided relief with restless leg type complaints due to the improved circulation.

For more information of the benefits of pregnancy massage take a look at TRE Wellness Centres website: www.trewellness.com

TRE Wellness Centre was evolved with a very clear goal in mind, which we believe makes us that little bit different.

Nicky Davies

Nicky has been in the allied health industry for over 12 years, with a passion for helping people of all ages and backgrounds to achieve their health goals. Nicky has a BSc in Sports Therapy from the UK, Pregnancy massage Certificate, Post Graduate certificate in Vocational Education as well as qualifications in Personal Training and Nutrition. As well as practicing, Nicky is also an educator of health and remedial therapies.

Read More

The Fix Program’s Yoga ‘Sun Salutation’

Enjoy the warmth and glow after this modification of the famous yoga sequence
 

In some of our Pilates classes, you may get a taste of the ‘Salute to the Sun’ or Sun Salutation. This is a common ritual and practice in all yoga styles and it has tremendous physical and mental benefits. To ‘salute the sun’, we are bowing down and respecting the energy, power and life the sun brings. It can be practiced anytime, but traditionally and typically is done each morning facing the sun as it rises. Not all of us are out of bed at this time, so make it one of the things you do every morning to charge the batteries, and say hello to your mind and body.

At The Fix Program, we cannot go past the amazing challenges it brings to our postural awareness, control and strength. From the breath with the diaphragm, to the mindfulness of good neck, trunk and pelvic posture, this sequence will have you on your toes, but feeling amazing for it.

So, what are the benefits of this practice?

  • If done quickly, this series of postures can have a cardiovascular effect on your heart and circulatory system.
  • If done slowly, there is a toning of muscles, and a ‘resetting’ if you like of the neuromuscular system to have your skeletal system working in the balanced way.
  • There is a meditative effect with flowing movements, and the effects of slow and deep breath.
  • The peripheral nervous system can be invigorated, from all that sliding and stretching of the nerve pathways. Think of the latter pose in ‘downward dog’ and the stretch through the lumbar spine and associate sciatic nerve. Wonderful!
  • The central nervous system is also invigorated with increased mindfulness and heightened awareness of breath, movement and your body. Keeping those brain neuronal pathways firing and becoming more intricate.
  • There is also thought to be positive effects on the digestive system, from stomach to the gut, and other positive effects of the organs as a knock-on effect of the improvements in circulation and blood flow.

Can I challenge you to try an easy Sun Salutation at home?

So if I’ve convinced you to give this a go, be patient and take time to learn this easy series of postures. Many of them (in fact almost all) are stretches and exercises already known from regular class attendance. It is now just about putting them together in a flowing sequence.

Being that it is me, physio from The Fix Program asking you to try this, be very mindful of all you have learnt from your classes here. Just because it is a Yoga practice, please don’t forget all of your Pilates cues! These things will protect you from injury and allow for you to achieve balance in your postural muscles. So, to remind you, here are the basics again for think of throughout your sun salutation:

  • Observe safe neck and upper back posture, so think of your ‘mangos under your chins’ and ‘shoulders melting into the upper back pockets’. Watch this particularly when your arms are holding your body weight.
  • Observe good alignment of your thorax over your pelvis. Think of your ‘floating and stacked rib plates’, trying not to collapse or spring in front.
  • Observe your awareness of safe and appropriate pelvis alignment in all poses. Where is your ‘pelvic bowl’ – straight (ish), level and in neutral. Remember to float about in neutral and not feel too rigid in this.
  • Watch your breathing continues and is ‘deep and wide’.
  • Be mindful and make adjustments to hip, knee and midfoot posture, so that you stack your legs under your hips well.
  • And remember that if a little more care is taken with all of this, your postural muscles will be working for you (yes, this means all of the pelvic floor, deeper abdominals, hip, upper trunk and shoulder girdle muscles). Hallelujah!

Let’s get started with the flow of the poses!

Keep referring to your mindfulness of all the postural cues above.

  • Begin in tall Active Standing. Breathe in to prepare.

  • As you exhale, roll down through your spine

  • Step your right foot back behind you at hip width and sink your hips forward into an easy ‘Warrior 1’ pose. Hold for 3 deep and wide breaths.

  • If this is too challenging for your balance and strength, modify this pose with your right knee grounded to support you. Hold for 3 deep and wide breaths.

  • Step your feet back together.

  • Step your left foot back at hop width and sink into an easy ‘Warrior 1’ pose for this side. Again, modify if you feel you need. Hold for 3 deep and wide breaths.

  • Step your right foot back to meet with the left. You are now in ‘Yoga plank pose’. Really watch your alignment and postures here to protect your neck, shoulders and lower back. Keep breathing.

  • With control, lower your plank to the floor, keeping your spine long and protected and elbows bending at your side near your waists.

  • Rest for a moment on your tummy and on an inhale, extend your arms to peel your chest and trunk from the floor with your legs still on the mat and toes pointed. Hold for 2-3 deep and wide breaths.

  • On an exhale, with toes curled back under, lift your hips and push them back towards your ankles. You are now in ‘downward dog’ pose. Watch your neck posture and melting shoulders, and imagine your sitbones lengthening to the sky. Try to extend out your knees and lengthen your heels to the floor. Hold for 3 deep and wide breaths.

  • If this is too challenging, allow your knees to bend as you push back into your heels. Hold again for 3 deep and wide breaths.

  • Let your knees bend and step your feet forward to your hands. Enjoy the heaviness of the relaxed body.

  • As you next exhale, roll up though your spine.

So this is the sequence. You will learn it quickly. Try to repeat it a few times if you’ve time. I aim for 5 rounds of this sequence, but this is personal. Some avid yoga fans can run through a ‘sun salute’ similar to this up to 20 times each morning!

Read More

Do I have stress fractures?

Shin pain explained

With the running season and warmer weather just around the corner, many of us may be slipping on our trainers to get out there and exercise. Be cautious! Have you suddenly increased our walking and running intensities to risk injury? A sudden increase in the levels of our exercise may cause overuse injuries, especially in our legs. This is particularly so for hips, knees, feet and everything in between.

There are many factors that predispose each of us to such injuries, but typically poor mechanics or weaknesses are the culprits. Other causes can include:

  • excessive training or activity
  • poor foot posture (especially flat feet or extremely high arches)
  • inappropriate footwear
  • inadequate warm up
  • training on hard or inappropriate surfaces
  • muscle weakness
  • tightness in specific muscles and joints, such as the calf, quads or buttock muscles
  • poor training technique or methods
  • leg length differences
  • poor balance
  • being overweight or generally deconditioned.

Let’s explore shin pain in more detail, as this is a very common complaint and diagnosis is often mistaken.

What causes shin pain?

There are several causes of shin pain, but the most common is shin splints. Shin splint pain is felt down the inside edge of the tibia (shin bone) and is due to an inflammation to stresses too heavy in the deep muscles of the calf. These deep calf muscles include tibialis posterior (the muscle supporting the arch of our foot), flexor digitorum longus (the muscle that curls or flexes our toes), flexor hallicus longus (the muscle that flexes our big toe) and soleus and attach to the inner border of the tibia. The connective tissue responsible for attaching these muscles to the tibia is known as the tenoperiosteum. Every time the calf contracts, it pulls on this tissue and if too forceful or repetitive, damage, inflammation and pain can occur.

Typically, the pain occurs with exercise and eases with rest. There is sometimes a rest at ache such as on the evenings after exercise.

This type of shin pain can sometimes occur with another cause of shin pain, compartment syndrome. Compartment syndrome occurs again in the calf and most frequently in the deep calf muscles we have mentioned above. These are closest to and just in behind the shin bone (as with shin splints). These deep muscles are encased in thin tissue called fascia, thereby creating a ‘compartment’ of muscle. When there is activity requiring repeated use of muscles within the deep muscular compartment (such as walking, running, dancing or jumping), there is a local increase in blood flow, causing the muscles to swell. Subsequently, the pressure within the compartment increases excessively (unable to escape) during activity. From this there can be symptoms such as muscular tightness, shin and calf pain, weakness, pins and needles or numbness.

The third common cause of shin pain is the one we hear of and fear the most – stress fractures. Being a physio who treats clients with shin pain, it is often thought by my patients that stress fractures are the cause of their pain. But this is rarely the case, thank goodness. Tibial stress fractures are very small incomplete fissures or cracks in the shin bone. They are due to compressive forces in the tibia being much greater than the bone can handle. This could be due to an inappropriate or sudden increase in training, training surfaces being too hard or uneven, or foot and shoe mechanics not being supportive enough. Most patients will recover with 8-12 weeks of appropriate rest and structured and gradual pain free return to exercise, although some will require up to 6 months.

With any person presenting with shin pain due to exercise, treating physios should always keep in mind the need for further investigative scanning if reduction in shin pain is not seen. Bone scans, MRIs, crutches, and bracing may be required to ensure correct diagnosis and if exhibiting stress fractures, allow for healing to occur with enough rest.

So, how do I know what is the cause of my shin pain?

Your friendly physio or podiatrist should be able to assess and get a really good idea of the sort of shin pain you have. By asking you about your exercise levels, looking at footwear, assessing your muscle strength, length and control about the hips knees and lower leg, having a good feel and poke around – we will get a great idea. Keeping in the back of our minds, the possibilities of referring for bone scans or MRIs ( to confirm our diagnosis) will be part of our thinking too.

Management of these injuries will really depend on what is causing the shin pain – massage and stretch work through tight muscles and structures of the leg such as the hip flexors and calves, muscle strengthening and stability work for weakened regions, advice on pacing plans to return to exercise without injury re-aggravation and of course, working with a podiatrist to improve foot mechanics, forces, orthotic prescription and shoe advice right for your foot and sport.

And how to I prevent all of this from happening in the first place?

Well we all know that prevention is better then cure, which again screams true. After all, the last thing you want is to be told you cannot exercise for 6 weeks or more – just as you are getting into your fitness regime beautifully and feeling the rewards.

So, to keep it simple:

  • Be sensible. Don’t jump from doing a little to climbing Mt Everest! Have an idea of the way in which you will slowly build your training up towards that goal.
  • Vary your training. Why not mix it up? Cross training days away from your running, or running and walking on differing surfaces such as the road, grass, or sand. By varying your training you have a better and more varied loading through your muscles and bones to prevent over stressing.
  • Have rest days. Most of us would have no problem here! But if you are really hard core with your exercise, your body needs days to recover, so give it that.
  • Happy feet. Make sure your shoes are doing their job. They need to be supportive, cushioned and not thread or sole bare. Seek advice from a podiatrist if your foot is really flat and shoes seem to not control over-pronation or excessive rolling inwards. Orthotics or even advice on shoes to support better will do you the world of good and prevent injury not only in your legs, but backs too.
  • Stretch and relax. Stretches particularly of the calf and lower leg are essential if you’re out there on your feet all day or for regular hitouts. Try out our calf slider for improving muscle length and strength.

So, no excuses to get out there and get a little fitter. See you on the starting line!

Read More

The reported benefits of SRC pregnancy wear

Hear how mums love the SRC shorts 

The gentle compression offered with this range of shorts and leggings can reduce pregnancy pains in the back and pelvis, and assist with keeping abdominal muscles activating as they should to support your back posture. This is particularly essential as the pregnancy posture takes hold. Support for the pelvic floor region, and help with the pain of varicose veins, other wonderful effects of pregnancy that no one told you about(!) are also achieved with wearing these garments.

The Fix Program is one of the few Sydney CBD based stockists of these shorts. We even offer a free of charge fitting appointment with one of our physiotherapists to make sure of your correct size. It is reported that women who found the shorts unhelpful were actually wearing shorts either too loose or too tight, losing the positive effects of wearing them altogether.

So, getting those measurements right is crucial!

Here are a few of the positive things women have stated with wearing these in both pregnancy and after.

“Going into my first pregnancy I had suffered sacroiliac joint, hip and lower disc pain for about five years. My condition was so severe I would have regular cortisone injections into my SIJ joints a few times a year, to relieve the inflammation and pain, not to mention the physio visits! I already had a cupboard full of back support braces and pelvic belts etc, but had heard about SRC Pregnancy shorts and thought why not give them a go? When they arrived I was a bit skeptical as they felt like they probably wouldn’t have enough support for me, but after persisting and wearing them for around 20 hours a day, and during the night, the results were instant. I absolutely loved them!”

“After delivering my baby, a healthy 10.5 pound bundle of joy, I began wearing the recovery shorts  from day 2 and with the combination of being healthy before and during pregnancy, then breastfeeding and wearing the shorts, my body bounced back to shape in no time.”

“I love these garments. There was a 2 inch split between my abdominal muscles after the birth of my second child and even though I didn’t get these garments until about one month post birth, they had an amazing impact. Not only did I feel much stronger through the core, they also helped reduce back ache by offering support when I bent down to pick up my (heavy!) son.”

“I commenced wearing the shorts the day after my second baby was born. I found the shorts to be extremely comfortable and immediately provided major support, compression and relief to my perineum and abdominal muscles.” 

So, have a chat with our physios after your pregnancy Pilates classes about these SRC Pregnancy and Recovery Shorts, or call us to arrange a time to come in and be fitted.

Read More

Showing 10 of 293 articles by Katrina Tarrant

Fix News