The Fix Program Blog

8 Aug 2015 BY Katrina Tarrant POSTED IN Pilates, Pregnancy

The reported benefits of SRC pregnancy wear

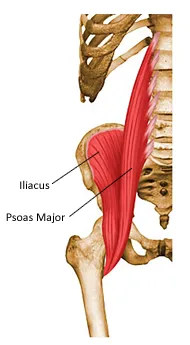
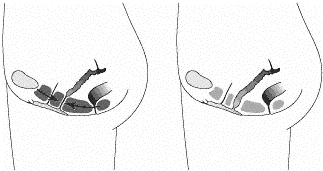
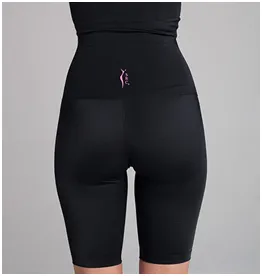
Hear how mums love the SRC shorts 

The gentle compression offered with this range of shorts and leggings can reduce pregnancy pains in the back and pelvis, and assist with keeping abdominal muscles activating as they should to support your back posture. This is particularly essential as the pregnancy posture takes hold. Support for the pelvic floor region, and help with the pain of varicose veins, other wonderful effects of pregnancy that no one told you about(!) are also achieved with wearing these garments.

The Fix Program is one of the few Sydney CBD based stockists of these shorts. We even offer a free of charge fitting appointment with one of our physiotherapists to make sure of your correct size. It is reported that women who found the shorts unhelpful were actually wearing shorts either too loose or too tight, losing the positive effects of wearing them altogether.

So, getting those measurements right is crucial!

Here are a few of the positive things women have stated with wearing these in both pregnancy and after.

“Going into my first pregnancy I had suffered sacroiliac joint, hip and lower disc pain for about five years. My condition was so severe I would have regular cortisone injections into my SIJ joints a few times a year, to relieve the inflammation and pain, not to mention the physio visits! I already had a cupboard full of back support braces and pelvic belts etc, but had heard about SRC Pregnancy shorts and thought why not give them a go? When they arrived I was a bit skeptical as they felt like they probably wouldn’t have enough support for me, but after persisting and wearing them for around 20 hours a day, and during the night, the results were instant. I absolutely loved them!”

“After delivering my baby, a healthy 10.5 pound bundle of joy, I began wearing the recovery shorts  from day 2 and with the combination of being healthy before and during pregnancy, then breastfeeding and wearing the shorts, my body bounced back to shape in no time.”

“I love these garments. There was a 2 inch split between my abdominal muscles after the birth of my second child and even though I didn’t get these garments until about one month post birth, they had an amazing impact. Not only did I feel much stronger through the core, they also helped reduce back ache by offering support when I bent down to pick up my (heavy!) son.”

“I commenced wearing the shorts the day after my second baby was born. I found the shorts to be extremely comfortable and immediately provided major support, compression and relief to my perineum and abdominal muscles.” 

So, have a chat with our physios after your pregnancy Pilates classes about these SRC Pregnancy and Recovery Shorts, or call us to arrange a time to come in and be fitted.


24 Jun 2015 BY Tabitha POSTED IN Pilates, Pregnancy

15 minute Pilates workout for pregnancy

Make some floor space and enjoy this routine at home

During pregnancy, it’s important to keep your body strong, stable and flexible. As your body changes with the growth of your bundle of joy, surges of the hormone relaxin help the pelvic ligaments to stretch and make room for pregnancy and birth. This creates increased movement of the pelvic joints which can cause pains around the buttocks and pubic bones for some women. The weight of your developing baby pulls the lower back into a greater arch causing the muscles there to overwork and feel light and tired. As a compensation for your changing lower trunk postures, the upper back, chest and shoulders tend to stiffen.

But the good news is that some pregnancy specific exercises, when done 3-5 times per week, can help to counteract all this, reducing pain, stiffness, and improving stability. So I’ve put together a short home exercise program for mums to be to practice at home, 15 minutes at a time, 3-5 times per week, to help protect you throughout your pregnancy and prepare you for the birth and recovery process.

Important things to consider while exercising in pregnancy

  • Take exercise at a gentler pace; don’t push yourself to achieve new personal bests while pregnant.

  • Check with your doctor whether they are happy for you to exercise in your pregnancy.

  • Taking care of your pelvic floor muscles should be a priority. These muscles are under a lot of load as your baby grows, so learn how to correctly contract and relax them, and avoid high impact exercise and heavy lifting to avoid extra strain on them. To get the pelvis floor muscles to relax, think of a pebble dropping into a pond and sending ripples out in rings along the surface of the water. This is the pelvic floor relaxing, dropping and widening (great for labour when pushing out your little one). To tighten and lift it, think now of the reverse, the ripples returning to centre and the pebble being lifted up out of the pond.


  • Be aware of good alignment, posture and form to protect the spine, pelvis and hips which are all undergoing major changes. Before you start an exercise ask yourself, is my pelvis in its neutral zone? Are my waists long and spine tall?

  • Take into account the fact that the hormone relaxin is making your ligaments and joints more flexible and mobile, so keep movements smooth and gentle to protect your pelvic joints.

  • When to avoid all exercise and seek immediate medical opinion: if you are having vaginal bleeding, breathlessness at rest or with little exertion, decreased frequency of the baby’s movements, high levels of pelvic and/or back pain.

So with all of this considered and checked, try out these exercises. See it as time for you. And for the health of you and your baby.

Front Hip Stretch


The Goal

  • To stretch and release the front muscles of your hips, which tighten a lot with your tipped forward ‘pregnancy pelvis posture’.

The Exercise

  • Bend the knees and pop the fingertips onto the floor between the legs
  • Step the right leg a big stride out behind
  • Sink the pelvis heavy towards the floor
  • Hover the back knee off the floor
  • Hold this position for 30 seconds and then repeat on the other side
  • You should feel a stretch at the front of your hip on the back leg

Extra Tips

  • Imagine a heavy weight attached to your hip on the front leg side, and imagine that weight dragging that hip down towards the floor
  • Gently reach the hip of your back leg forward, and extend the heel out behind

Wall squat


The Goal

  • To strengthen your thighs, buttocks and upper arms – you will need good strength here for labour postures and when caring for your new bub.
  • To stabilise the trunk, neck, knees and shoulders in an ideal alignment throughout

Getting ready

  • Start with your back against the wall, with the tailbone flat against the wall, a little arch behind the lower back and flat ribs and upper back against the wall, and soft relaxed neck and shoulders
  • Set up your feet wider than the hips, and keep the knees as wide as the middle of each foot
  • Keep your pelvis neutral – imagine your pelvis is a big fruit bowl full of water and the water is level, not spilling out the front or back of the pelvic bowl.
  • Grow tall up both sides of your waist and notice that the pelvic floor and deep tummy gently engage

The Exercise

  • Inhale to prepare deep and wide
  • As you exhale, become aware that the pelvic floor and tummy are already gently engaged, and slide down the wall into a squat
  • Hold there and check that your knees are still wide in line with the feet, that the tailbone is still flat on the wall, the little arch behind the back has not changed, and the ribs and upper back lie flat on the wall
  • Gently slide your shoulder blades down the back away from the ears, open the chest and tuck your chin a little towards the middle throat
  • As you hold your squat, inhale, as your exhale engage pelvic floor, tummy
  • Repeat 8x as you hold your squat. Do this 4 times.
  • You should feel your thighs working hard.

Extra Tips

  • As you hold your wall squat, squeeze you buttocks for a moment and feel the sit bones under your pelvis seem to travel closer together. Then let the buttocks relax, and feel the sit bones widen. Keep the butt relaxed and the sit bones wide throughout the exercise.
  • Check that your tail bone stays flat on the wall and it’s tip does not curl under you, flattening the lower back arch as your thighs start to fatigue
  • Keep those shoulders gently back and down, and a softness in the neck
  • Keep breathing lovely deep, wide breaths
  • Imagine your feet resting lightly on egg shells or marshmallows, and the thigh bones drawing back into the hip sockets

Single Leg Floats


The Goal

  • To use the deep stabilising postural muscles of the trunk to maintain a great spinal and pelvic alignment as you move the legs. Your deep abdominal corset really needs to work hard in pregnancy and this exercise will help you achieve strength and endurance.

Getting ready

  • Lie on your back on a mat with your knees bent
  • Have your feet and knees hip width and check that your tail bone rests flat and heavy on the mat (this should give you a gentle arch behind your lower back)
  • Rest your hands on your ‘headlights’ (the pointy bones at the front of your pelvis) on each side to check that you are not rocking your pelvis in any direction.

The Exercise

  • Take an inhale deep and wide to prepare
  • As you exhale, lift the pelvic floor, draw the headlights together and float one leg up stopping with the knee over the hip, bent to 90 degrees
  • Stay for an inhale deep and wide and relaxed
  • As you exhale, lift the pelvic floor, draw the headlights together and lower the leg back down for a light controlled landing.
  • Repeat 4x each leg, alternating sides each time, for a total of 8 reps
  • You should feel the pelvic floor and the lower abdomen gently engaging to help control your posture

Extra Tip

  • Use the pelvic floor and deep tummy to keep your tailbone flat, the back arch the same shape, and prevent any rocking of the headlights side to side.
  • Imagine you have marshmallows or eggs shells underneath the soles of your feet again and you are not allowed to squash them throughout the exercise. Think light feet!

Toe Tapper in side lying

The Goal

  • To strengthen your buttock muscles that stabilise the hips and pelvis whilst maintaining ideal trunk posture. Keep those strong pert buttocks!

Getting ready

  • Lie on your side
  • Have your knees bent, feet back in line with your bottom, neck supported by a pillow or towel
  • Stack your hips one right over the other
  • Find your neutral lower back arch, tuck your ribs in at the front, and stack your shoulders one right over the other
  • Lift your lower waist a little off the mat to straighten out your spine

The Exercise

  • Take an inhale to prepare, deep and wide
  • As you exhale, acknowledge that the pelvic floor and deep tummy muscles are already gently engaged as you maintain a neutral spine and pelvis
  • As you inhale lift the top leg, heel first in line with the body
  • As you exhale engage the pelvic floor, deep tummy and lower the leg toe first to tap, tap, tap on the floor
  • Repeat 2 sets of 8, one each leg
  • You should feel you buttock working on the top leg side

Extra Tip

  • As you lift the leg, imagine the thigh bone being sucked up into the hip socket
  • Imagine your leg is a heavy, floppy, dead weight being dragged through thick honey
  • Keep the top hip forward and the foot back
  • Keep the knee and toe always facing the floor
  • Don’t let the back arch change shape or the pelvis rock and roll

Pidgeon Stretch


The Goal

  • To stretch and release your buttock muscles. A favourite of our pregnancy ladies.

Getting Ready

  • Set yourself up on all fours
  • Bend your right knee up in front of the body so that the knee is roughly mid-line and the foot rests under the left hip
  • Extend your left leg long and straight out behind you

The Exercise

  • Sink your hips down towards the floor
  • Rest your forehead on your forearms if that feels comfortable, or stay up with weight on your hands if that feels better
  • Hold for 30 seconds and then repeat on the other side
  • You should feel a stretch in the right buttock

Extra Tips

  • Reach your left hip down towards the floor gently
  • Imagine your right hip growing long away from your waist and ribs towards the foot end of your at

Bow and Arrow Stretch

The Goal

  • To stretch the muscles about your upper back, chest, ribcage and shoulders and encourage free movement of the spine and ribcage into rotation. Another favourite – really get into the zone and enjoy this!

Getting Ready

  • Lie on your right side with your neck supported by a pillow or rolled up towel and your knees bent
  • Stack your hips one directly over the other and bring your hands together out in front of your shoulders resting on the floor

The Exercise

  • Reach your left hand forward along the floor feeling that the arm stays relaxed and the movement comes from the upper back rotating
  • Draw your left arm back along your right and across your chest and out behind you to make a T shape
  • Fold the hand back to the chest and reach forward again to repeat
  • 10 x each way, and repeat on the other side
  • You should feel stretching around the upper back, shoulder, chest and ribs

Extra Tips

  • Imagine you are an archer drawing a big bow and arrow
  • Turn the upper body but keep the pelvis still
  • Turn your thumb to face the floor

Enjoy! If you’re struggling with pains around your pelvis despite your exercises, please let one of our staff know. We can help with hands on physiotherapy treatments, women’s health physiotherapy consults, and can fit you with pregnancy pelvic belts or compression shorts if they’re needed for a bit of extra support.


20 Jun 2015 BY Heba Shaheed POSTED IN Exercise, Physiotherapy

Men and World Continence Week

The male pelvic floor – yes guys, you have one too!

What is the male pelvic floor?

The pelvic floor muscles extend like a hammock from the tailbone at the back, to the pubic bone in front. A man’s pelvic floor muscles support his bladder and bowel. The urine tube and the back passage all pass through the pelvic floor muscles. The pelvic floor helps with bladder and bowel control and is important for sexual function.


Which guys need to do pelvic floor strengthening exercises?

All men need healthy pelvic floor muscles, but some may have weak muscles. They are those who are:

  • suffering of ( or having survived) prostate cancer
  • recovering from surgery for bladder or bowel problems
  • overweight
  • often heavy lifting
  • suffering with coughing that goes on for a long time (such as smoker’s cough, bronchitis or asthma)
  • urinary incontinent e.g. men who wet themselves when they cough, sneeze or are active
  • bowel incontinent
  • experiencing dribbling after urination
  • experiencing erectile dysfunction.

What about if his pelvic floor muscles are too tight?

Some men experience chronic pelvic pain, such as pain with erections. This can be because the pelvic floor muscles are too tight or in spasm. When the muscles stay tight they become painful. In this case, men should be doing more relaxation and ‘down-training’ ( or letting go) of the pelvic floor muscles, as squeezing these muscles will make them tighter, and therefore more painful. Tight pelvic floor muscles are also common men with pudendal neuralgia (irritation of the nerves of the pelvic floor region), urgency (needing to urinate more frequently than what is considered usual, or with certain triggers) and constipation.

How can men find out which exercises he should be doing?

Real-time ultrasound by a trained men’s health physiotherapist can help visualize the muscles. This method of ultrasounding allows for a clear picture on a monitor screen of how the pelvic floor muscles are contracting (and in ‘real time’), much like watching the black and white pictures of a pre-natal baby scan.The physiotherapist can then design an exercise program for you based on your needs.

If you are at all worried about the function of your privates ‘down there’, as physios at The Fix Program we would be happy (and very capable) to speak with you privately about your symptoms. If needed, we can refer you to a men’s health physiotherapist for an assessment and treatment plan.  

Afterall, bladder and bowel problems, no matter how small, are not normal. Don’t put up with it. Tell someone who cares and seek help.


14 Jun 2015 BY Katrina Tarrant POSTED IN Pilates, Sydney CBD

Draft Pilates Timetable Term 3 2015


12 Jun 2015 BY Katrina Tarrant POSTED IN Exercise, Physiotherapy

The hip flexor muscles

Picturing the front hip muscles


Visual pictures can really help with locating the tricky and deep tissues in our body that we cannot see. This is especially so for our recent work in our Pilates classes on the front hip strength and stability.

“Imagine standing on eggshells and your thigh sinking back into your hip.”

This is the instruction to help you to activate the deep front hip muscle called ‘iliacus’. You can see this muscle in the image. Iliacus is a part of the hip flexor muscles – the ones that lift your leg up in front of you as with walking or lifting each leg to walk up stairs. Psoas major is another of these, and is the stronger of the 2.

Iliacus has a more important role and that is to hold the top of your leg bone or femur securely in the hip socket. Iliacus should do this as the bigger muscle ‘movers’ go about moving your leg about. It is one of the muscles giving that ball and socket joint a lovely tight fit.

By looking more at the iliacus muscle in this picture, you can almost imagine that as it contracts or shortens (as a muscle does when it activates), it will suck the leg bone up into the pelvis better.

And hence our postural cue above!

So when we do our squats, lunges, and mat work, picture your iliacus gently drawing your femur into your pelvis for a happier and healthier hip. And remember that sometimes we will not feel much happening at all, and quite often this is the goal.

Subtle, subtle! Less is more.


Lorimer’s Pain Quiz

Do you really know how pain works in your body?

So we have all been in pain from time to time or perhaps more frequently than we’d like. Does this make us an expert on pain? Lorimer Mosely has a post-doctorate in pain and was also a physio in days gone by. He has adapted a pain quiz to test us on our knowledge on all things nerves, brains and pain. Test yourself on this extract from his quiz. I’ve reworded some questions to make them easier to understand, but if you’d like the full quiz, let me know.

Answer true or false to these statements.

  1. Pain only occurs when you are injured.
  2. The intensity of pain matches the severity of the injury.
  3. Nerves in the periphery of your body (the limbs) can adapt by becoming more excitable.
  4. Chronic pain means the injury has not healed properly.
  5. The body tells the brain when it is in pain.
  6. The pain you feel is the same pain as your grandparents felt.
  7. In chronic pain, the brain becomes more sensitive to danger messages from your muscles and joints.
  8. The immune system has nothing to do with a pain experience.
  9. The brain decides when you will experience pain.
  10. Stress can make your nerves fire.
  11. Your internal pain control system is stronger than any drug taken.
  12. Chronic pain is more common in wealthier countries of the world.

Did you write down all of your answers? You can check the answers below.

Pain is an amazing thing and we are still unravelling its complexity in our bodies, brains, psychology and biology. Modern scanning has allowed for a real window into the brain and our understanding has grown in the past decade. So much so that this understanding has given us as health professionals the ability to educate our patients about the pain they are in. And on top of that, the research demonstrates that through knowing and understanding pain, pain can actually be diminished in individuals from this alone! Incredible. 

If this interests you, there are a few amazing books about for suggested reading. Why not try Explain Pain ( Lorimer Mosely, David Butler) for a fresh view on the physiology of pain, or The Brain That Changes Itself (Norman Doidge) for wonderful tales about the brain’s ability to change, called neuroplasticity.

Know pain, no pain.

Quiz answers:

1.F 2.F 3.T 4.F 5.F 6.F 7.T 8.F 9.T 10.T 11.T 12.T


2 Jun 2015 BY Katrina Tarrant POSTED IN Pregnancy, Women's Health

Women and World Continence Week

Bladder leakage, no matter how light, is not normal

Although embarrassing, bladder and bowel troubles are common, affecting 1 in 4 people in Australia. Although common, it is not normal to be suffering from these troubles. Pregnancy, the post natal period and menopause are the times we women may experience leaky bladders and other issues ‘down there’.

We need to start talking more openly about this topic - with family, girlfriends, doctors and women’s health physios. If you are at all worried, your GP or even your Fix physio would be a great place to start.

When researching for this blog post with my circle of friends and colleagues, I found an alarming trend. One I had not thought of working within the health industry, as to me, any troubles ‘down there’ would mean immediate attention and appropriate management. Perhaps obvious to me and other physios, but not to all those other women out there.

It seemed that if there were stories and admissions of leaking (or other pelvic floor issues) within a circle of girlfriends or mother groups, there seemed to be an acceptance that this was normal. On a positive note, it is wonderful to hear that at least the conversation had started, however, on a negative note, hearing that as a group, bladder troubles were considered a normal part of being a woman, is very disheartening.

Bladder or bowel control issues can be treated, managed and even cured with the help of a pelvic floor physiotherapist. It will not get better on its own, and it needs specific pelvic floor exercises, and changes and improvements to your toilet habits

There is help at hand.

Here are some important facts

  • Leaking is NOT a natural part of childbirth, ageing, or being a woman.

  • Bladder or bowel control issues do NOT get better on their own.

  • Incontinence CAN be treated, managed and even cured with the help of a pelvic floor physiotherapist.

  • Many women lose control during pregnancy or after childbirth and that sets them up for a lifetime of issues, which can be worse after menopause.

  • Sometimes the issue is not only muscle weakness. Prolapse, or sagging of the bladder, uterus or bowel could be the cause and a support device called a pessary can give immediate relief.

This all sound a little bleak, doesn’t it? It may, but don’t put up with it. Tell someone who cares and seek treatment. Heba and Tabitha are here at The Fix Program to help. You may not be aware, but they have had extensive post grad training in pelvic floor conditions unique to women.


17 Apr 2015 BY Heba Shaheed POSTED IN Women's Health

Painful sex in women

Vaginismus 

Whilst most women enjoy sex, there are some women who find sex painful and still others who are unable to even have sex at all. One of the main conditions that this occurs in is vaginismus.

Vaginismus is an involuntary tightening of the pelvic floor muscles during attempted insertion of an object into the vagina. This could include penetration during intercourse or insertion of a tampon or speculum. When the muscles tighten, women can feel pain, which can range from a mild discomfort to severe pain that can be stinging, burning, tearing or aching.

Vaginismus is not something women have control over, and some women may be completely unaware that it is happening. In some women the muscles can become so tight, that it feels like the vagina is totally closed and penetration cannot occur. In others, the muscles allow for penetration, but the tightness of the muscles causes enough pain that intercourse must be stopped.

vaginal muscles

A woman can have primary vaginismus – which is associated with attempting to have sex for the first time, and being unable to. Women may feel like their partner bumps into a wall where the opening should be. This is the most common cause of unconsummated marriages.

Secondary vaginismus is when the tightness and inability to have intercourse occurs after a period of being able to enjoy sex. This can happen for a number of reasons including:

  • Yeast infections or recurrent urinary tract infections
  • After a difficult childbirth
  • Prolapse of your pelvic organs into the vaginal area
  • Menopause, due to hormonal changes, leading to vaginal dryness or atrophy
  • Abuse or trauma
  • Pelvic conditions such as endometriosis, cysts, tumours, lichen sclerosus
  • Anxiety or stress
  • Partner issues

Vaginismus can be treated by your women’s health physiotherapist, who will use a few different treatment techniques to help you have sex comfortably. For primary vaginismus, these include:

  • Vaginal desensitization
  • Pelvic floor muscle relaxation exercises
  • Internal muscle releases around the vagina and pelvic floor muscles
  • Vaginal trainers/dilators

In secondary vaginismus, more techniques may need to be employed in addition to the above treatments. Sometimes a referral to your GP or to a sex therapist or psychologist may be indicated, who will work alongside your women’s health physiotherapist. Treatment choices here include:

  • Scar tissue massage

  • Pessary for prolapse support

  • Discussion about vaginal oestrogen with your GP

  • Electrical stimulation

  • Hip and pelvic stretches

  • Complex management of pathology such as endometriosis including nutrition advice and visceral and fascial release of scar tissue and adhesions

Remember, with vaginismus, it is NOT all in your head. With an appropri

ate women’s health physiotherapy management plan, women can overcome vaginismus within a few months, and can go on to enjoy a normal sex life.

Call us if you are experiencing vaginismus. We can help.


17 Apr 2015 BY Tabitha POSTED IN Exercise, Physiotherapy, Pilates

Pilates for your neck

Pockets for your shoulder blades. A wonderful gift to your neck and upper back

shoulder blades 

Struggling with neck tension? A stiff upper back? Shoulder and arm pain? Headaches?

Have you ever asked yourself, “Are my shoulder blades in their pockets?” This trick will help you to hold your shoulder blades in the correct position, alleviating many common problems stemming from this area.

But what does this all mean?

Whether you are in our Fix Program Pilates classes or in physiotherapy treatment, we always emphasise that good pelvis position provides your lower back with a sturdy base. We know that poor pelvic stability and posture is regularly linked to back pain. At the other end of the spinal chain, there are many muscles criss-crossing your upper back and neck, many of them connecting to your shoulder blades. In fact, supporting the neck and shoulder girdles is their main function. In the same way as the pelvis, a well-situated pair of shoulder blades stabilises your shoulders, upper back, and neck by evenly distributing tension and stress across the area. If they are poorly positioned, they can make matters much worse.

 Let’s look closer at the important anatomy of the region

anatomy of shoulder

The shoulder blades (or scapulae) float around on top of your ribcage and some of the muscles that hold them in place are highlighted in the picture above.

The big neck muscles (trapezius) connect the neck, shoulder and upper back. If these muscles become tight from being overused ( such as too much PC work), they not only pull on your neck but also on the shoulder blade, which can cause a variety of knock-on effects in the other connected muscles. Your scapula can be pulled out of alignment ( such as sit too high or drop too low on your upper back) or be prevented from sitting flush against your body. This is the ‘winged’ look you see of some shoulder blades. 

How do I get these upper back muscles working in a balanced way about my shoulder blade?

Let’s try to set our blades in a good alignment together now.

  • Inhale and widen your shoulder blades across your upper back.
  • Exhale and lift the outer points of your shoulders slightly upwards, bringing your shoulders slightly backwards.
  • Imagine the lower tip of your shoulder blade gently sliding down your back and tucking into your latissimus dorsi (the purple muscle above), like a hand sliding into a jean pocket on your bum.
  • Once you feel them settle into their pockets, your shoulder blades will evenly distribute the stress and tension in your upper back and neck much better than before, so your neck will feel wonderfully free.

This is tricky to do well without the guidance of a physiotherapist, so feel free to ask one of us to check your technique. Less is definitely more – think tiny, subtle movements of the shoulder. Try setting your blades into this posture and holding it for 30 - 60seconds, ten times throughout your day; you’ll be surprised how much they jump out of their pockets when you’re not paying attention! The best time to do it is when you are using your arms. Why not try when:

  • you are sitting at your desk?
  • you are reading?
  • you are lifting groceries, laundry, bags, weights or children?
  • you are feeding your baby?
  • you are playing sport? during your golf swing, tennis serve, batting stroke.

I’m sure you get the idea. Try using red dots to remind you to reset your blades. You can read more about this at Exercises-to-break-poor-postural-habits

As you begin to hold your blades in their best possible position, your neck will begin to feel more free and soft, and your upper back more relaxed. But remember, be gentle as you slide your blades flatly into their muscular pockets and use them as they were intended – to support your entire upper body.


22 Mar 2015 BY Katrina Tarrant POSTED IN Pilates, Sydney CBD

Draft Pilates Timetable Term 2 2015


Fix News